Chicagoland Skywarn APRS Radio, TNC, and Software Setup
Node Suffix Identifiers (SSIDs)
CALLSIGN: Home iGate, Home Fill-in Digipeater, or Home Weather Station (if you have 1 packet station at home only) Usually a message capable station.
CALLSIGN-1: Other station, digipeater, mobile, or anything
CALLSIGN-2: Other station, digipeater, mobile, or anything
CALLSIGN-3: Second Digipeater
CALLSIGN-4: Igate
CALLSIGN-5: D-Star, Android, I-phone, Blackberry
CALLSIGN-6: Special event, satellite ops, camping
CALLSIGN-7: Pedestrian/HT
CALLSIGN-8: Boat, RV, second mobile
CALLSIGN-9: Primary Car Station (mobile)
CALLSIGN-10: WinLink Station
CALLSIGN-11: Hot Air Baloon, Aircraft
CALLSIGN-12: One-way trackers (such as TinyTrak 3/4), APRStt, RFID
CALLSIGN-13: Weather Station or Weather/Combo Igate
CALLSIGN-14: Primary Truck Station (mobile)
CALLSIGN-15: Primary Digipeater
WIDEN-N Digipeating explained by WA8LMF
1. Setting up your TNC
Kantronics KPC3 Plus
PacComm
A. Set the following parameters on your TNC (change your TNC to expert mode if necessary):
mycall kc9aaa
myalias WIDE1-1
unproto aprs via WIDE2-2
btext !4205.90NS08743.76W#PHG5360 W2, ILn - MyTown, IL EN62dc
beacon every 90
txdelay 30
digipeat on
xmitok on
where kc9aaa is your callsign and your latitude and longitude in the DDMM.hundredthsofMM format.
You may also enter information of the radio capabilities of your station in the beacon comment (btext) using the PHG format.
You would substitute the 5360 in the example above for the numbers you obtained for your antenna and transceiver specifications.
B. Change to unproto aprs via WIDE3-3 only if you are more than 75 miles from an internet gateway (iGate). Otherwise leave as shown above. C. Change beacon every 30, if necessary so your station beacons every 30 minutes. This depends on your TNC settings. D. Set the time and date on your TNC using the proper commands. You may need to look this up. E. Set your TX and RX frequency to 144.39 MHz
2. Setting up an I-Gate using UI-View (Windows)
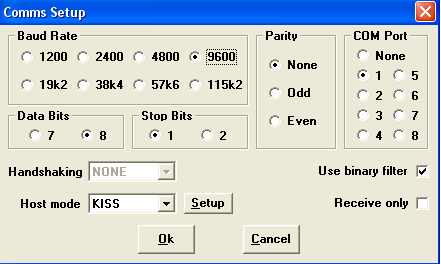
A. Download UiView32 v2.03 B. Register your callsign, free. C. Install UiView. D. Setup TNC communication settings Under Setup-> Comms Setup.
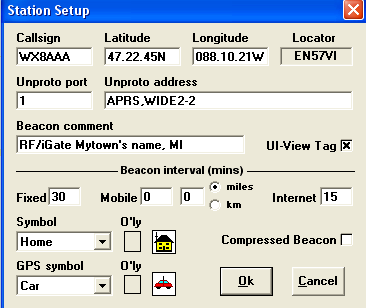
 E. Under Setup->Station Setup, Complete station callsign (change WX8AAA to your callsign), latutude, and longitude. Lat/Lon in the format DD.MM.hundrethsofMM. Rural stations (more than 75 miles from another iGate station) can set the Unproto to WIDE3-3. Most stations in Chicagoland should NOT set your unproto path to WIDE3-3 because it causes unnecessary interference to an already busy APRS frequency. If outside IL, Substitute your state for IL, and if you are operating wide 3-3, change W2 to W3, otherwise just leave it alone. Also, change EN62dc to your grid square.
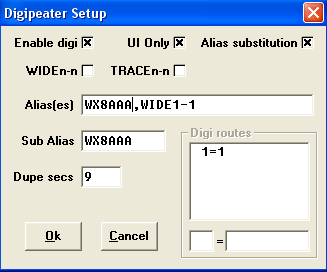
 F. Under Setup->Digipeater Setup, edit your callsign in place of WX8AAA and set similar to shown below. (choose OK if prompted before below dialog box appears)
 G. Under File, Choose "Download APRS Server List" and enter the server as shown below. Next, press Download.
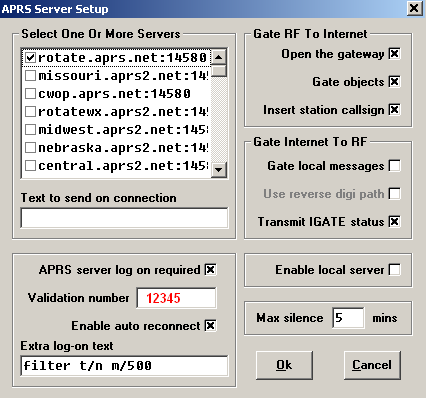
 H. Under Setup->APRS Server Setup, set iGate APRS server settings. Be sure to use the validation number you received after registering your callsign. Per the instructions on UiView, you have to retrieve the registaration number from a website since it will not be emailed to you. You can set any multiple servers you like. Below is just one example.
 J. Go to Action->Connect to APRS Server K. Connect 2m radio to TNC and tune to 144.39 MHz FM mode for transmit (TX) and receive (RX). L. Press F9 to send a beacon packet over the air. M. Go to findu.com and enter your callsign to see if your station appears. Alternatively, you can go to aprs.fi and enter your callsign under "Track callsign:" You may have to type your callsign on the login page under "Callsign or nickname:" first, if visiting the page for the first time.
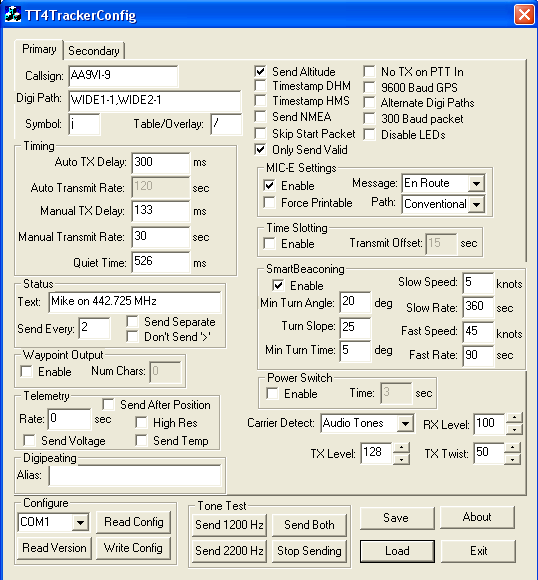
3. Setting up a mobile station using Byonics Tiny Traker 4 (Windows)
Many users are using the Byonics TinyTrakers. Below are the settings you should use if you are in a suburban area, like Chicago. (If you plan to travel to a rural area like Northern Michigan or Northern Wisconssin, you may change the DigiPath to WIDE1-1,WIDE2-2.) Substitute your callsign kc8aaa. The callsign-9 is the standard mobile identifier. Put whatever you want in the status text field. Save memory on your TinyTraker by using the same settings for the Primary and Secondary windows. You can toggle between these setting using the tabs at the top of the screen. Recieve and transmit frequency for your radio should be 144.39 MHz. It's best to include an RF choke using a ferrite doughnut on the GPS line into the tracker and/or bypass caps on the power leads from the battery and PTT-ground line on the GPS in line. TinyTrakers have RFI issues which can be mitigated this way.
4. Setting up an WX Station/I-Gate using UI-View (Windows) and Peet Brothers Ultimeter 2100
A. Connect cable with serial output from Ultimeter 2100 display unit's side port to computer's serial input. You may need
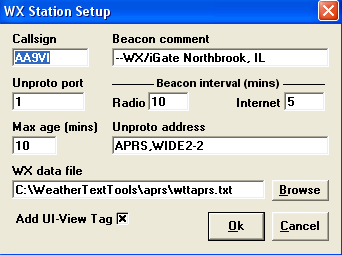
to get a USB to serial adapter, if nexessary. B. On the Ultimeter 2100, go into Data Logger Mode by pressing the -0- and the anemometer button at the same time. Hold for 3 seconds, until display stops flashing. C. Open WeatherText Tools program. Go to Connect->Connect and Receive Weather Text. D. In WeatherText Tools go to APRS->View APRS String. E. Open UI-View. Go to Setup->WX Station Setup. Use similar settings shown below, but change the beacon comment to your preference and the callsign to your own.
 F. In UI-View, Go to Action->Connect to APRS Server. G. Turn on your TNC and radio. Use the TNC settings shown above in the home i-gate settings. Go to Setup->Station setup in ui-view and set fixed and internet beacon interval to 0. Otherwise your WX station will be sending null data labels to the radio and internet. All of your transmit internal setting should be done in the WX Station Setup tab. Make sure you don't transmit on :00, :15, :30, and :45 minutes of the hour since many stations may do that at the same time causing network congestion.
5. Setting up an WX Station/I-Gate using Xastir (Linux or Mac)
A. Make sure your TNC is configured properly and connect it to the linux box.
B. Download the latest version of xastir from
sourceforge or if you have a Debian
distribution you may use the "apt-get install xastir" command to install Xastir. However, if you
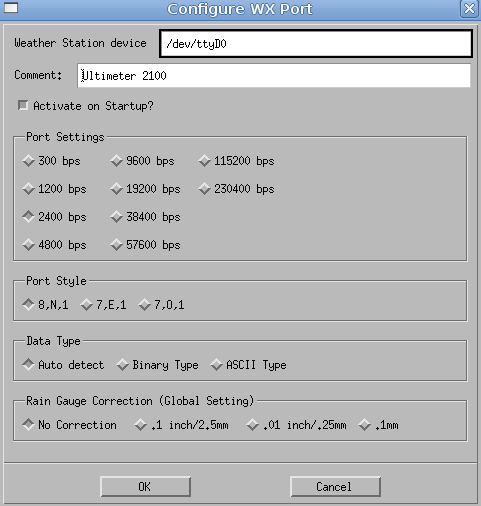
plan to use a Peet Brothers 2100 weather station you must download Xastir 1.9.5 or greater.
C. Install xastir according to the instructions at:
the official Xastir site
D. Start Xastir by oepning a command window and typing "xastir &"
E. When Xastir has finished loading, configure as following
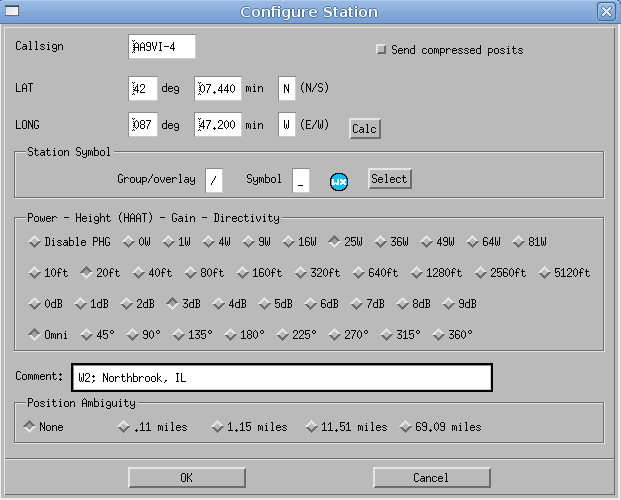
File--> Configure--> Station
Configure station latitude, longitude, station icon, station power/height, and comments
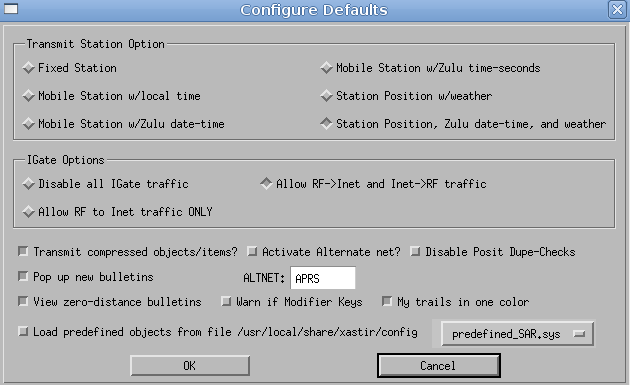
F. Then go to File--> Configure --> Defaults
Set station type, and igate options
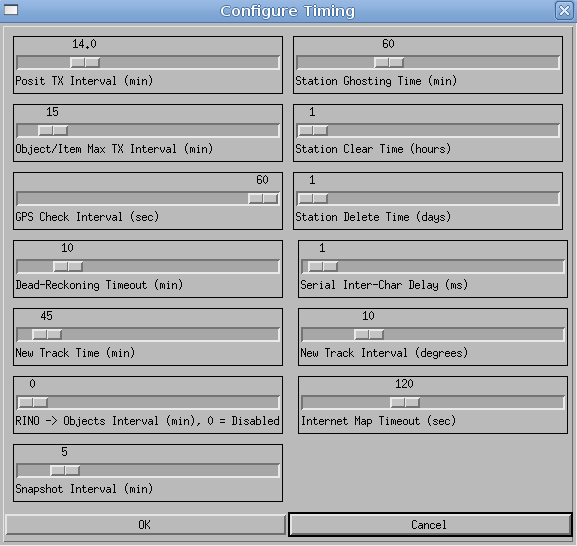
G. Then go to File--> Configure --> Timing
Set TX interval (posit TX interval), and disable RINO (set=0)
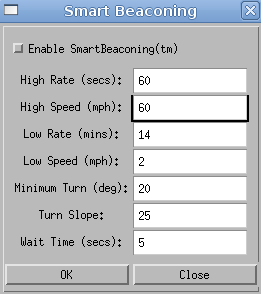
H. Then go to File--> Configure --> Smart Beaconing
Disable this
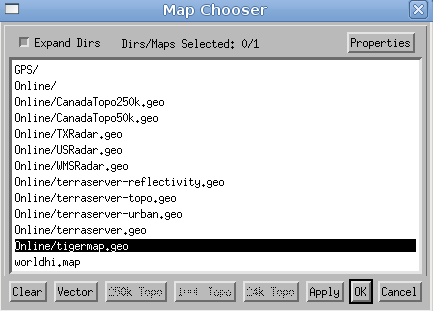
I. Then go to Map--> Map Chooser
Set the map type
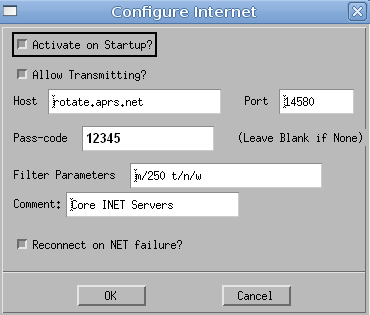
J. Then go to Interface--> Interface Control
Choose Add, then Internet. Hit OK once settings are complete.
Choose Add, then serial TNC
Choose Add, then serial WX
Click on each new interface you just set up and hit Start.
K. Then go to File--> Configure--> Save Config Now!
This way you can save all your settings when Xastir starts.
L. You may also use an configuration template instead of manually configuring the program.
Be sure to use your own callsign, location, and passcode for the APRS server.
Download example file and place in the
/home/yourusername/.xastir/config
xastir.cnf
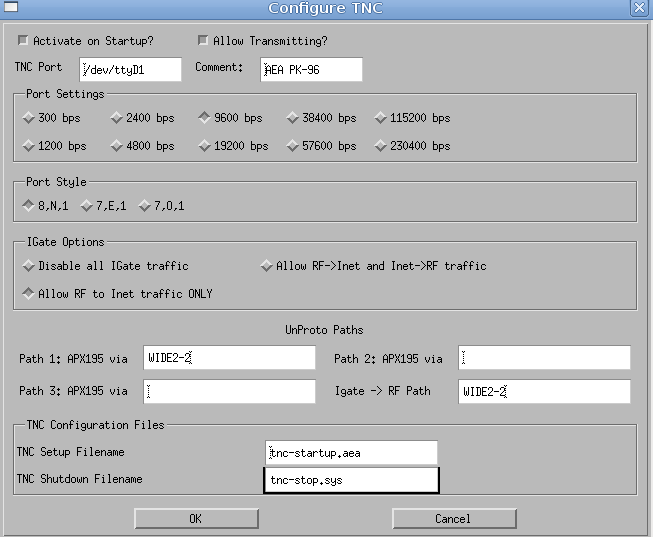
and the following AEA PK-96 or Kantronics KPC3 file in /usr/local/share/xastir/config
tnc-startup.aea
or tnc-startup.kpc3
6. Setting up an I-Gate using Xastir (Linux or Mac) A. Similar to step 5 except you don't have to create a WX serial interface and you should choose
a different station type in configure station.
Setting up a WX station that is not on APRS (non-ham radio)
Visit the CWOP configuration page.There's some nice software and a tutorial to help you out.
THANKS FOR YOUR SUPPORT!